
Contents:
USB Print Server Installation
Navigating the Web Configuration Utility
Navigating the Bi-Admin Management Utility
Product Specifications for USB Print Server
USB Print Server User Guide
USB Print Server Installation
Prepare for installation
Note: For the most updated information, visit: http://www.usr.com/support
Turn on your desktop or laptop computer. Type your password if you are prompted to do so.
Attention Windows 2000 and XP Users: Before you install the USB Print Server, Windows 2000 users must have Service Pack 4 installed and Windows XP users must have Service Pack 1 installed on your computer. If you do not have the appropriate Service Pack installed for your operating system, the USB Print Server software will not install the necessary drivers for the USB Print Server. Go to www.windowsupdate.com to download the correct Service Pack.
Note: Be sure to find out what letter your CD-ROM drive uses before you begin installing your new product. You will need to know this to properly install your software.
Note: During the Installation procedure, you may be prompted for your Windows Operating system CD-ROM or for your printer manufacturer's CD-ROM. Make sure you have them available in case you need them.
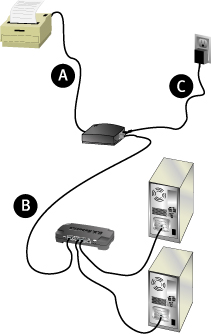
Step One: Connect the USB Print Server and the USB Printer to your existing network
![]() Connect the square
end of a USB cable to the USB port on your printer. Connect the thin rectangular
end of the USB cable to the USB port on the USB Print Server. Make sure
your printer power cable is plugged in.
Connect the square
end of a USB cable to the USB port on your printer. Connect the thin rectangular
end of the USB cable to the USB port on the USB Print Server. Make sure
your printer power cable is plugged in.
![]() Connect one end
of an Ethernet cable to your router or switch and the other end to the
Ethernet port on the USB Print Server.
Connect one end
of an Ethernet cable to your router or switch and the other end to the
Ethernet port on the USB Print Server.
![]() Connect the included
power adapter to the power socket on the USB Print Server. Plug the power
adapter into a standard power outlet.
Connect the included
power adapter to the power socket on the USB Print Server. Plug the power
adapter into a standard power outlet.
Step Two: Configure the USB Print Server
Main Computer Setup Instructions
Make sure your computer is turned on. Insert your USRobotics Installation
CD-ROM into your CD-ROM drive.
Note: If your CD-ROM does not automatically launch, click Windows Start, Run, and type D:\autorun (if your CD-ROM drive uses a different letter, type that letter in place of "D") and click OK.
Select Setup Wizard from the CD-ROM Interface. Click Next. Select the Server name from the list (the default name is on the bottom of the printer server) and click Next. Change the name of the printer server, if you want. Select your Domain Name from the dropdown menu or type in the name of the network domain or workgroup and click Next. Select Obtain an IP Address Automatically and click Next. If you want to assign a specific IP address, select Fixed IP Address, manually enter the appropriate information, and click Next. Click Finish to complete the setup.
You will then be prompted to install the PTP driver. Click Yes and follow the on-screen instructions.
You will then need to set up the printer. In the window that opened, double-click Print Driver Setup. Select the printer and the port and click Next. When the printer is added, click OK. In the Configure Printer Port window, click Add New Printer. Locate the printer in the Shared Printers area, select it, and the click Next. You may need to provide the drivers for the printer. Either select the make and the model of the printer and click OK or insert the printer manufacturer’s CD-ROM and click Have Disk. Type your CD-ROM drive letter and click OK. When you are prompted to make this printer your default, select either Yes or No, click Next, and then click Finish.
Client Computer Setup Instructions
Insert the Installation CD-ROM into your CD-ROM drive. Click Installation
and then click Next. You will need to select the type of user that
this computer will be: User,
Administrator,
Custom,
or IPP Client.
- User
is the most common option that the majority of network clients will
want to choose.
Select User from the list and click Next. Click Next, Next, and then Finish. This will install the USB Print Server driver on your computer. You will then see the USB Print Server as an option when you go through the Add New Printer procedure.
- Administrator
will install the necessary tools for initial configuration, as well
as the Bi-Admin Management Utility. This should only be chosen by more
advanced network clients.
Select Administrator from the list and click Next. Click Next, Next, and then Finish. This will add the Bi-Admin Management Utility to your computer. Click the icon on your desktop or the program menu link to launch the Bi-Admin Management Utility. You can use the Bi-Admin Management Utility to configure the settings of the USB Print Server.
- Custom
allows the network client to select the options that will be installed
from any combination of the Bi-Admin Management Utility, the Setup Wizard,
and the Peer-to-Peer Print Port driver. This should only be chosen by
more advanced network clients.
Select Custom from the list and click Next. Select the options that you want to install: Setup Wizard, BiAdmin, Peer to Peer Driver, and Installation Guide (PDF). Click Next. Click Next, Next, and then Finish.
- IPP Client
is required if you want to print to any IPP servers, either on the local
network or accessed remotely over the Internet. This should only be
chosen by more advanced network clients.
Select IPP Client from the list and click Next. Select either Install the IPP Client Driver on this PC or Download self-extracting Zip file and click Next. Click Next, Next, and then Finish.
To configure any additional client computers on the network to use the USB Print Server, insert the Installation CD-ROM and repeat the Client Computer Setup Instructions for each computer.
When you have completed the setup for the main computer and any client
computers, you will be able to use your USB printer over your network.
Congratulations! You have finished installing the USB Print Server.
For troubleshooting and technical support information, refer to the Troubleshooting section in this guide or to the USRobotics Web site at www.usr.com
Register your product
• At the Installation CD-ROM user interface, click the Support link. Click Registration and Warranty and then click http://www.usr.com/productreg
• You can also launch a Web browser and type in http://www.usr.com/productreg
![]()