
Contents:
Hardware Installation >
Specialized Internet Connection Instructions
Wireless Turbo Access Point & Router User Guide (Windows 95, 98, 2000, NT, Me, XP, and Macintosh)
1. Connect your modem to the Wireless Turbo Access Point & Router
- Turn off your computer and your cable or DSL modem.
- Attach both antennas to the Wireless Turbo Access Point & Router.
- Locate the Ethernet cable from your cable or DSL modem that is connected to your computer’s Ethernet adapter.
- Disconnect that Ethernet cable from your computer’s Ethernet
adapter, and connect it to the WAN port on the rear of the Wireless
Turbo Access Point & Router.
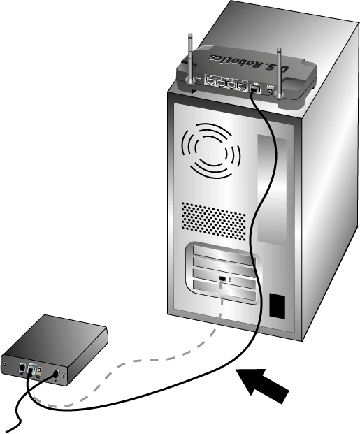
Note: Some cable or DSL modems can be connected using either a USB cable or an Ethernet cable. To connect your cable or DSL modem to the Wireless Turbo Access Point & Router, you must use an Ethernet cable.
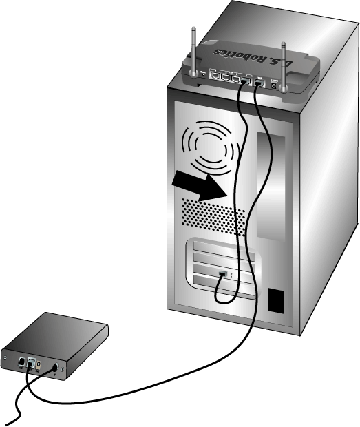
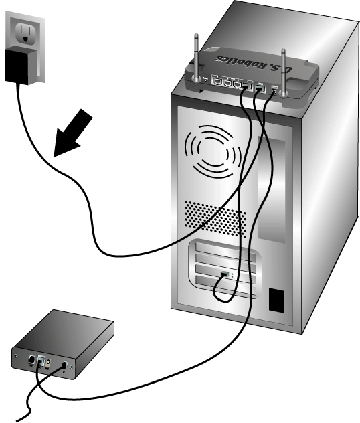
2. Connect your Wireless Turbo Access Point & Router to your computer
and the power supply
To make a wireless connection: Make sure each wireless card that will be connected to the network is set to Infrastructure mode. If necessary, refer to your Wireless Card manual to determine how to change this setting.
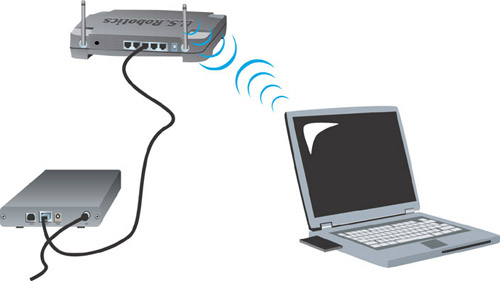
To make an Ethernet connection: Connect one end of the supplied Ethernet cable to your computer’s Ethernet adapter. Connect the other end to one of the LAN ports on the Wireless Turbo Access Point & Router.
All Users:
Turn on your cable or DSL modem. Connect the included power adapter to the power socket on the Wireless Turbo Access Point & Router. Plug the power adapter into a standard power outlet. Turn on your computer.
3. Configure the basic connection settings
Launch a Web browser. In the location or address line of your Web browser, type http://192.168.123.254 to access the Web User Interface. The default user name is admin. There is no default password for the Wireless Turbo Access Point & Router. Click OK to login.
Perform the steps of the Setup Wizard to configure the basic connection settings of the Wireless Turbo Access Point & Router. Refer to the “Specialized Internet Connection Instructions” chapter in the User Guide on the Installation CD-ROM for instructions on collecting your configuration information.
When you are finished configuring the basic connection settings, you should now have Internet access. Launch a Web browser and register your product at www.usr.com/productreg If the page loads, you are finished with the installation procedure. If the page does not load, refer to the Troubleshooting section.
Note: Refer to the “Configuring the Wireless Turbo Access Point & Router” chapter in this guide for more detailed configuration information. Contact your ISP if you have any questions about your WAN type or your connection information.
Congratulations! The installation procedure is now complete. You should now have secure and shared Internet access. If you experience any difficulties, refer to the "Troubleshooting" chapter of this guide for more detailed information.
If you have any difficulties connecting to the Wireless Turbo Access Point & Router, check the following top three issues and see if they apply to your situation.
- If you are attempting to create a wireless connection but cannot connect to the Wireless Turbo Access Point & Router, make sure each wireless card is set to Infrastructure mode. If the wireless cards are set to 802.11g AdHoc mode, you will not be able to connect to the Wireless Turbo Access Point & Router. When each wireless card is set to Infrastructure mode, it should automatically connect to the Access Point of the Wireless Turbo Access Point & Router. If the wireless cards do not automatically connect, rescan until they detect the Wireless Turbo Access Point & Router and connect.
- If you create a wireless connection to the Wireless Turbo Access Point & Router but are experiencing poor link quality, check the positioning of the Wireless Turbo Access Point & Router. Long distances, multiple floors, or steel or concrete walls can diminish the link quality. If possible, reposition the Wireless Turbo Access Point & Router to reduce the effect of any of these obstacles.
- If you have the Wireless Turbo Access Point & Router properly connected and can access the Internet but are experiencing difficulties connecting with special applications (e.g., ICQ, Battle.net, etc.), you must assign specific ports in order to bypass the firewall function. For more information about how to configure this function, refer to the “Special Applications” section within the “Configuring the Wireless Turbo Access Point & Router” chapter of this guide.
If you are still experiencing any difficulties, proceed to the "Troubleshooting" chapter of this guide.
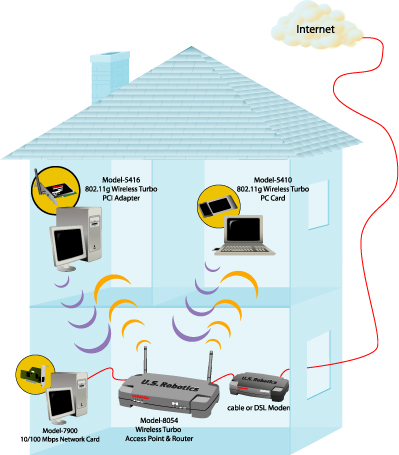
The following graphic is a representation of your system topology after
the installation of the Wireless Turbo Access Point & Router.
![]()