
Contents:
Hardware Installation >
USRobotics ADSL Ethernet Modem User Guide
Hardware Installation
Standard Shipment Contents
Your USRobotics ADSL Ethernet Modem comes with the following items:
- One ADSL Ethernet modem
- One Installation Guide
- One Power Adapter (18 VAC)
- One RJ-11 Cable
- One Ethernet Cable
- One Installation CD
- One Registration Card
If you did not receive all of the items above, contact your service provider or dealer.
Hardware Requirements
The following hardware is necessary to configure and use the ADSL modem:
- A 10/100 Ethernet Network Interface Card (NIC) installed on your computer.
- A PC with a Web browser, either Internet Explorer 4.0 or above or Netscape 4.0 or above. (If you do not have the required browser, visit http://www.microsoft.com/ or http://www.netscape.com/ to download and update your browser. While installing the software, you should enable JAVA functionality for web-based configuration to work.)
- A PC with communications software, such as HyperTerminal in Win 95/98, for flash crash recovery.
- For the management console port option, a PC equipped with an available DB-9 or DB-25 serial port.
- A line filter may be required for each telephone that will share a line with the ADSL modem. Make sure there is no filter installed between the ADSL modem and the phone wall jack. Microfilters may be supplied by your DSL Internet Service Provider.
Front Panel LEDs of ADSL Modem

| LEDs | Description |
| PWR | The power LED is illuminated when power is applied to the ADSL Router. Check your power adapter connection if the LED is not illuminated. |
| ALM | The alarm LED is illuminated when an error occurs. |
| LAN | The LAN LED is illuminated when there is an Ethernet connection between the ADSL router and your computer. It will be blinking when there is Ethernet traffic. It will not be illuminated if an Ethernet cable is not connected. |
| DSL | The DSL LED is illuminated when there is an ADSL connection. It will be blinking when there is ADSL traffic. It will not be illuminated when the ADSL cable is not connected or the ADSL connection fails. |
Note: All the LED's will be illuminated for approximately 30 seconds when you power on or reboot the ADSL modem.
Rear Panel Connectors of ADSL Modem
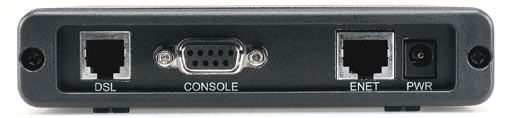
| Connector Label | Description |
| PWR | Power Plug - connects to the power adapter. |
| LAN | Ethernet Port - connects to the Ethernet port on your PC or an Ethernet hub. |
| CONSOLE | Management RS-232 Console Port - connects to the serial port on your PC. |
| DSL | ADSL Port - connects to the phone wall jack. |
LAN Connector
The pin-out of the ADSL modem's RJ-45 jack is the same as a standard Ethernet UTP jack.
ADSL Connector
The RJ-11 jack of the ADSL modem uses pin 3 and pin 4.
Install the ADSL Ethernet Modem
- Connect one end of the RJ-11 phone cord to the DSL port on the rear of your ADSL modem. Connect the other end of the RJ-11 phone cord to your wall phone jack.
- Connect one end of the Ethernet cable to the ENET port on the rear of the ADSL modem. Connect the other end of the Ethernet cable to the Ethernet port on the NIC in your computer.
Note: To connect the ADSL modem directly to a PC or to the uplink port of a hub or router, use the Ethernet cable that was provided with your ADSL modem. The Ethernet cable that came with your ADSL modem is a straight-through UTP copper cable. To connect the ADSL modem to a port other than the uplink port of a hub, a crossover UTP cable must be used.
- Plug the AC power adapter cord into the PWR jack at the rear of the ADSL modem. Plug the AC power adapter into a standard wall outlet. The ADSL modem is always supplied with power, so there is no power switch to turn on. The PWR LED on the front panel of the ADSL modem will be illuminated if power is being supplied to the modem. If your computer is not on, turn it on now.
Verification of correct operation
Use the following procedures to verify the installation and operation of the ADSL modem. Refer to the Troubleshooting section of this guide if any problems occur.
- Launch an Internet browser on the computer connected to the ADSL modem.
- Enter a URL of your choice or enter http://www.usr.com in your Web browser.
- Watch the DSL LED on the front of the ADSL modem blink as data is transmitted or received. If the selected Web page comes up in the Internet browser screen, the network connection is successfully established.
Additional Options
Install External Micro-filter for the Telephone
In certain situations without a POTS splitter, transient noise from a telephone can interfere with the operation of the ADSL modem and the ADSL modem may introduce noise to the telephone line. To prevent this from happening, a small external micro-filter must be connected to each telephone.
![]()