
Contents:
EasyConfigurator Installation
EasyConfigurator Advanced Features
USRobotics SureConnect ADSL
Wireless Gateway User Guide
Windows 95, 98, NT 4.0, Me,
2000, XP
Macintosh and Linux
Installation Overview & System Requirements
Note: It is important that you have your serial number written down for future reference. If you ever need to call our technical support department, you will need this number to receive assistance. You can find your 12-character serial number on a bar code sticker located on the bottom of the gateway and also on the box. You will also need your model number.
What You Need Before You Begin
- Active ADSL and Internet service from your local telephone company or Internet Service Provider (ISP).
- Your user name and password, if they were assigned.
- Some installations may require a special splitter between the gateway and telephone wall jack. The splitter must include both a phone jack and a router jack. If it does not, do not install it between the wall jack and the gateway.
Your ISP should be able to provide the following, if needed:
- VPI/VCI values
- ADSL Standard (Modulation)
- Encapsulation Mode
- Authentication (PAP or CHAP) for PPP connections
Gateway Installation
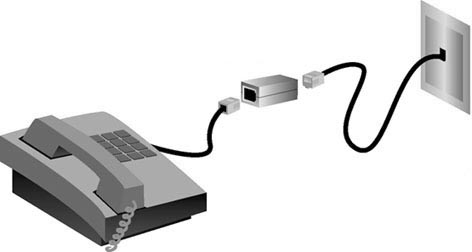
Step 1. Connect Microfilters (if included or required by your ISP)
Your ISP will determine if microfilters are necessary. If microfilters were not included, check with your ISP to determine if microfilters are needed.
To install the microfilter, plug the phone into the microfilter, and then plug the microfilter into the telephone wall jack. Do not install a microfilter on the cable that connects your gateway to the telephone jack unless your microfilter has a connection for both the telephone and the ADSL device.
Step 2. Setting Up Your Computer for Installation (Macintosh and Linux users skip to Step 3)
Before you plug the gateway into the computer, you must first install the software. Make sure that your computer is on. You should have your operating system CD-ROM readily available.
Insert the Installation CD-ROM into your computer�s CD-ROM drive. The installation will start automatically. This process may take a moment.

In the event the installation does not start automatically, click Windows Start and then Run. Type D:\setup.exe in the dialogue box and click OK. (If your CD-ROM drive uses a different letter, type that letter in place of D.)
- Follow the on-screen instructions to complete the software installation.
- A qualification test will run to verify that your system meets the minimum requirements for installation. The Results screen will display those items in your configuration that passed with a green flag and the ones that failed with a red flag. If your system passed the qualification, click Next.
- If your system fails the qualification test, click View Report to identify which component(s) failed. For additional information, refer to the Troubleshooting section of this installation guide.
Step 3. Install the Antennas and Cables
- Attach the antennas to the back of the gateway.
- Plug the AC power adapter into the 16VAC jack on the back of your USRobotics SureConnect ADSL Wireless Gateway. Plug the AC power adapter into a standard wall outlet. If the PWR LED on the front panel is not illuminated, press the Power switch on the back of the gateway.
The gateway will initialize after the power is turned on. This process may take a moment.
For Windows Users only: Click Next. The necessary files will be copied to your system.
Connect one end of the included grey telephone cable to the grey telephone port on the back of your gateway labelled ADSL. Connect the other end into the telephone wall jack. For Windows Users only: Click Next.
Select one of the following connection options.
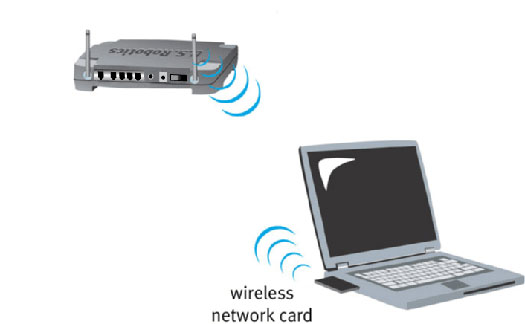
Via a wireless connection:
Scan for the Wireless Gateway and associate to it. For Windows Users only: Click Next.
Via an Ethernet connection:
Install the yellow Ethernet cable. While networking up to four devices is optional, additional devices should be connected after the initial setup is complete. Insert one end of the yellow Ethernet cable into the yellow Ethernet 1, Ethernet 2, Ethernet 3, or Ethernet 4 port on the back of the gateway. Connect the other end of the Ethernet cable to the Ethernet port on your computer�s 10/100 network interface card (NIC). For Windows Users only: Click Next.
Setup will detect your modem and then install the SureConnect ADSL EasyConfigurator. This process may take a moment.
For Macintosh and Linux users: Insert the CD-ROM and follow the on-screen instructions. Mac 10 Users: Double-click the CD icon from your desktop, open Install.htm, and follow the on-screen instructions.
Step 4. Configure the Gateway with EasyConfigurator
Note: For NT 4.0 users, Service Pack 3 or later is required in order to run EasyConfigurator.
- The SureConnect ADSL EasyConfigurator screen will appear and prompt you for a user name and password as demonstrated in the following graphic:
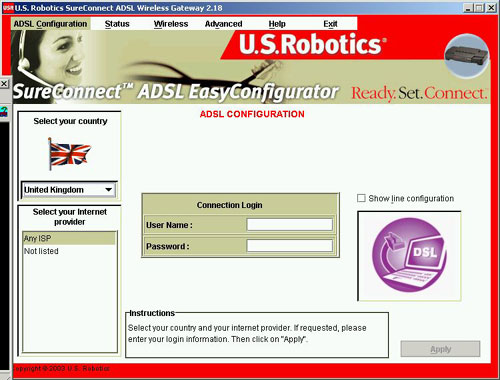
- Select your country and your Internet Service Provider (ISP) from the lists. Click Apply. If you do not see your ISP listed, refer to the Troubleshooting section of this installation guide.
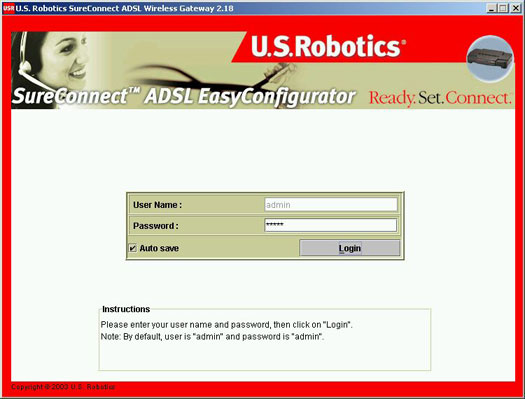
These fields are case sensitive. Be sure your Caps Lock mode is off. The default user name is admin. The default password is admin. Make sure these values are correct and click Login. This process may take a moment.
EasyConfigurator will now configure your gateway. This process may take a moment.
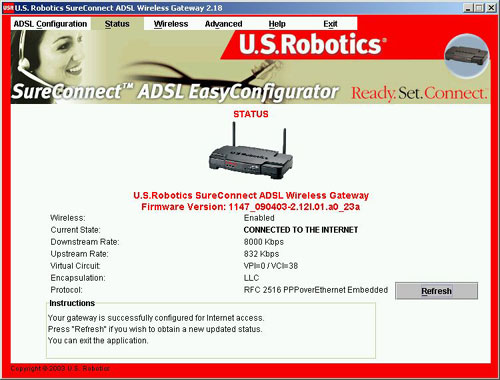
When the current state is CONNECTED TO INTERNET, as demonstrated in the following graphic, your USRobotics SureConnect ADSL Wireless Gateway is successfully configured for Internet access. You can start browsing now. Register your product and test your connection by going to the following Web site: www.usr.com/productreg
If you did not receive this message, refer to the Troubleshooting section of this installation guide.
Step 5. (Optional) Verify the Wireless Configuration
Click the Wireless menu at the top of the screen. EasyConfigurator will query your gateway and after some time, display the current wireless state.
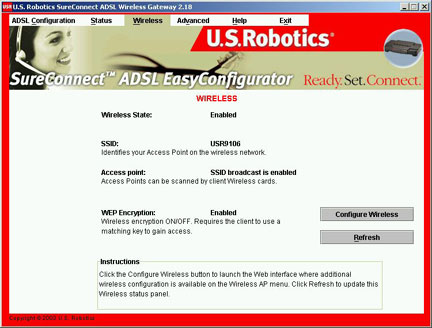
The default settings are as follows:
Wireless Status = Enabled
Access Point = SSID Broadcast Enabled
WEP Encryption = Disabled
If you want to change these parameters, click Configure Wireless. A Web browser will launch momentarily. It is recommended that you enable WEP and assign a security secret key. Make sure you assign the same secret key to your wireless devices to ensure future connectivity. To further guarantee wireless security, enable the Mac Filter options on the Wireless - Mac Filter web user interface screen.
If you have any difficulties connecting to the USRobotics SureConnect ADSL Wireless Gateway, check the following top two issues and see if they apply to your situation.
- If you are attempting to create a wireless connection but cannot connect to the USRobotics SureConnect ADSL Wireless Gateway, make sure each wireless card is set to Infrastructure mode. If the wireless cards are set to 802.11b AdHoc mode, you will not be able to connect to the USRobotics SureConnect ADSL Wireless Gateway. When each wireless card is set to Infrastructure mode, it should automatically connect to the Access Point of the U.S. Robotics SureConnect ADSL Wireless Gateway. If the wireless cards do not automatically connect, rescan until they detect the USRobotics SureConnect ADSL Wireless Gateway and connect.
- If you create a wireless connection to the USRobotics SureConnect ADSL Wireless Gateway but are experiencing poor link quality, check the positioning of the USRobotics SureConnect ADSL Wireless Gateway. Long distances, multiple floors, or steel or concrete walls can diminish the link quality. If possible, reposition the USRobotics SureConnect ADSL Wireless Gateway to reduce the effect of any of these obstacles.