Windows 98SE/Me USB Printer Installation
A USB printer can be connected to the Wireless MAXg Router and used as a network printer if you are using an operating system that supports printing to an Internet Printing Protocol (IPP)-based printer. Windows 98SE and Windows Me operating systems require that Internet Printing Services be installed in order to utilize the print server function of the USR5461.
Step One: Internet Print Services Installation
Windows 98 Users
- Download and install the Internet Print Services from Microsoft's Web site. http://www.microsoft.com/windows98/downloads/contents/WUPreviews/IPP/Default.asp
- Follow the instructions provided by Microsoft.
- When the installation is complete, restart your computer.
Windows Me Users
- Install the Internet Print Services from the Add-on folder located on the Windows Millennium Edition CD-ROM.
- Follow the instructions provided by Microsoft.
- When the installation is complete, restart your computer.
Step Two: Local Printer Installation
Note: If your printer and printer software is already installed on your computer, skip to Step Three: Print Server Configuration.
Before configuring your printer on the print server, it is important to install it on your computer using the drivers provided by the printer manufacturer.
- Plug your USB printer into one of the USB ports on your computer.
- Install the printer by following the installation instructions included with your printer.
- Print a test page to ensure that the printer is working properly.
Step Three: Print Server Configuration
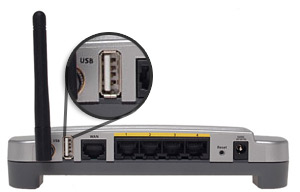
- Plug the thin rectangular end of the USB cable into the USB port on the Wireless MAXg Router. o
- Connect the power supply to your printer and turn your printer on.
- Launch a Web browser. In the location or address line type 192.168.2.1
and press Enter.
Note: If you have modified your router's IP address, enter the new IP address instead of 192.168.2.1
- When the user name and password window appears, type in the user name and the password you created. Click OK to load the router's setup page.
- In the Device section of the Status page, look for the Printer status and Printer location information. Write down the Printer location address. This information will be used in step 10.
- Click Windows Start, Settings and then
Printers.
- Click Add Printer.
- The Add Printer Wizard will launch. Click Next.
- Choose the radio button labeled Network printer. Click Next.
- In the Network path or queue name field, enter the Printer location address recorded during step 5. Click Next.
- Select the manufacturer and model of your printer. Click Next.
Note: If your printer does not appear in the list, please repeat Step Two: Local Printer Installation.
- Select Keep existing driver (recommended). Click Next.
- When prompted, select Yes to set this printer as your
default printer. Click Finish.
Note: You will not be prompted to login the first time you connect to the MAXg Router's Web User Interface. During the Setup Wizard procedure, you will be prompted to create a user name and password to log in to the router. If you create a user name and password, you will need to use these whenever you want to log in to the Wireless MAXg Router. The user name and password are case sensitive.
Note: Perform the following steps to set up your printer. This procedure must be performed on every computer on the network.
Note: The URL information is case sensitive and must be entered exactly as it is listed on the Printer location section on the router's Status page.
Step Four: Verify the printer's connectivity
- Click Windows Start, Settings, and then Printers.
- Verify that your printer is listed. Right-click on your printer and select
Properties.
- Click Print Test Page.