Installing a USB Printer in a Linux Environment
A USB printer can be connected to the Wireless MAXg Router and used as a network printer if you are using an operating system that supports printing to an Internet Printing Protocol (IPP)-based printer. Linux provides support using the Common UNIX Printing System (CUPS).
Step One: Print Server Configuration
Note: The CUPS daemon must be running before you perform these steps.
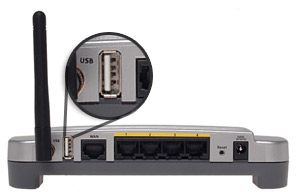
- Plug the thin rectangular end of the USB cable into the USB port on the Wireless MAXg Router.
- Connect the power supply to your printer and turn your printer on.
- Start Web browser. In the location or address line type 192.168.2.1 and press Enter.
- Note: If you have modified your router's IP address, enter the new IP address instead of 192.168.2.1
- When the user name and password window appears, type in the user name and the password you created. Click OK to load the router's setup page.
Note: You will not be prompted to login the first time you connect to the MAXg Router's Web User Interface. During the Setup Wizard procedure, you will be prompted to create a user name and password to log on to the router. If you create a user name and password, you will need to use these whenever you log on to the Wireless MAXg Router. The user name and password are case-sensitive. - In the Device section of the Status page, look for the Printer status and Printer location information.
Write down the Printer location address. This information will be used in step 7 of Cups Configuration.
Step 2: CUPS Configuration
Note: Perform the following steps to set up your printer. You will need to do this on every computer that is connected to your network and wants to be able to access the printer.
- Start a Web browser. In the location or address line type http://localhost:631 and press Enter.

- Click Manage Printers.
- Click Add Printer.
- Enter the Super User (SU) account user information and click OK.
- Enter the name, location, and description of the printer that you are installing and click Continue. The specific names are not dependent upon any information already entered.
Note: "Location" is not the same as the "Printer Location", that you recorded in step 6 of the Print Server Configuration procedure. "Location" notes the physical location of the printer. For example, a printer located at home and in the basement could be assigned the location "Home-Basement. "Name" is the name that will be used to identify this printer in the command line.
- Select Internet Printing Protocol (http) in the Device field and click Continue.
- In the Device URI field, enter the "Printer Location", that you recorded in step 6 of the Print Server Configuration procedure above and click Continue.
Note: The Device URI information is case-sensitive and must be entered exactly as it is shown in the Printer location section on the router's Status page. If you have modified the IP address of your router, use your router's IP address in place of 192.168.2.1.
- Select the manufacturer and model of your printer and click Continue.
- Select the model of your printer and click Continue.
Note: If your printer does not appear in the list, open the Software link in the menu into a new window or tab, and search the CUPS repository for your printer drivers. - Click Printers to display information about your printer.

Step Four: Verify the printer's connectivity
- Click Print Test Page to confirm that the printer is communicating with your computer.